Enjoy!
Showing posts with label tutorial. Show all posts
Showing posts with label tutorial. Show all posts
Friday, September 21, 2012
Knitting Tutorial
A friend of mine and I are working on a pair of socks. :) I challenged her to try this pattern, Diamond Swirl Socks, and I'm working it along with her. There is a part of the pattern that is called "Interlocking Diamonds" and part of that is a Right Twist and a Left Twist. They are basically 1/1 cables. I am providing this video to show how I handle small cables like this without a cable needle.
Enjoy!
Enjoy!


Wednesday, January 4, 2012
What did I do yesterday? or How to Piece Batting Scraps.
Yesterday ... well, I pieced batting :)

I save the strips of batting that come when you trim the edges of quilts. These are usually anywhere from 2 to 4 inches wide, but some can be about a foot or more.
I start by sorting and making sure my strips are from the same type and color of batting.
Then I lightly iron them so that they dont' have any major wrinkles and will lie flat.


 not quite enough pieced together yet.
 nice big piece for my project.
 close up of seams.

 and then took it to the machine and zig zag quilted all the radius seams ... and used a narrow bias binding for the binding, although I turned it all to the back except for the center circle.


I save the strips of batting that come when you trim the edges of quilts. These are usually anywhere from 2 to 4 inches wide, but some can be about a foot or more.
I start by sorting and making sure my strips are from the same type and color of batting.
Then I lightly iron them so that they dont' have any major wrinkles and will lie flat.
Then I find two with straight edges and I use a large zig zag to sew the edges together. I butt the edges together as I put it under the presser foot so that there will not be a ridge or bump on the seam line.


If I don't have straight edges, then I will cut them so they are straight, or overlap the edges of two pieces and cut through the overlap. This makes two edges that will butt together nicely to make a flat seam - even if it's a wavy seam, it won't show as long as it's not bumpy.


After a bit of this .. you have a nice flat piece of batting that can be used.
 not quite enough pieced together yet.
 nice big piece for my project.
 close up of seams.
I used mine yesterday for a quilted tree skirt to go on the small Christmas tree that we purchased this year and is on a microwave cart in our dining room. I had the top pieced a week or so before Christmas, but never got around to getting it quilted an on the tree. So I went ahead and basted ....


And that's how I spent most of yesterday.
Friday, June 10, 2011
Jean Wallet Tutorial
The Tutorial for the Jean Wallet is below. If you prefer a pdf file.. click here.
I freely give this for you to use for your own personal use and for gift giving or charity. Please do not sell my pattern as it is not yours to profit from.
Let's begin:
You will need denim material cut from old jeans: (a corduroy material would work as well.)
Use ¼” seam allowance unless otherwise specified.
Outside Pockets
1 – 4 ½” x 6”
1 – 4 ½” x 3”
Base of Wallet
1 – 4 ½” x 10”
Large Inside Pocket:
1 – 3 ¾” x 10”
Inside Pockets:
1 – 2 ½” x 3 ¾” with a Pocket Flap 1 – 3” x 3”
1 – 3” x 3 ½”
I used rectangles that were precut for something else and had to seam two pieces together for the 10” long pieces. I do this by sewing a 3/8” seam and then finger pressing it open before I top-stitch on both sides of the seam. You can make this nearly invisible, or you could choose a high-contrast thread and make it a design feature.


Use a pinking shears and trim the very edge of each piece. You don’t want to reduce the size of the pieces, so be very careful to trim as little as possible.

Lay out your Wallet Base and the Large Inside Pocket. Match them on three raw edges. Measure in from one side 3 inches. Draw a line with pencil. This line is your sewing line. Sew on the line as shown here:


Fold the Wallet Base back so that you have just the Large Inside Pocket on one side, and the three layers on the other. Lay your 2 ½” x 3 ¾” pocket on one end, matching the raw edges as shown here. Sew on the three outside edges of this pocket.

Place the Pocket Flap on top of and “above” the pocket. The edge of the flap should be atleast ½” away from the edge of the pocket. Stitch across the top of the flap to hold it in place.


 I'd love to see your wallets! Post a comment below and you can link to your blog so that we can see what you've made! I think these wallets would be extra cute with embellishment like fabric paint, embroidery, applique, or beads.
I freely give this for you to use for your own personal use and for gift giving or charity. Please do not sell my pattern as it is not yours to profit from.
Let's begin:
You will need denim material cut from old jeans: (a corduroy material would work as well.)
Use ¼” seam allowance unless otherwise specified.
Outside Pockets
1 – 4 ½” x 6”
1 – 4 ½” x 3”
Base of Wallet
1 – 4 ½” x 10”
Large Inside Pocket:
1 – 3 ¾” x 10”
Inside Pockets:
1 – 2 ½” x 3 ¾” with a Pocket Flap 1 – 3” x 3”
1 – 3” x 3 ½”
I used rectangles that were precut for something else and had to seam two pieces together for the 10” long pieces. I do this by sewing a 3/8” seam and then finger pressing it open before I top-stitch on both sides of the seam. You can make this nearly invisible, or you could choose a high-contrast thread and make it a design feature.


Use a pinking shears and trim the very edge of each piece. You don’t want to reduce the size of the pieces, so be very careful to trim as little as possible.

Next, stitch around each piece a scant ¼” from the edge all the way around so that you have a box of stitching on every piece. Do this with a matching thread.
Lay out your Wallet Base and the Large Inside Pocket. Match them on three raw edges. Measure in from one side 3 inches. Draw a line with pencil. This line is your sewing line. Sew on the line as shown here:

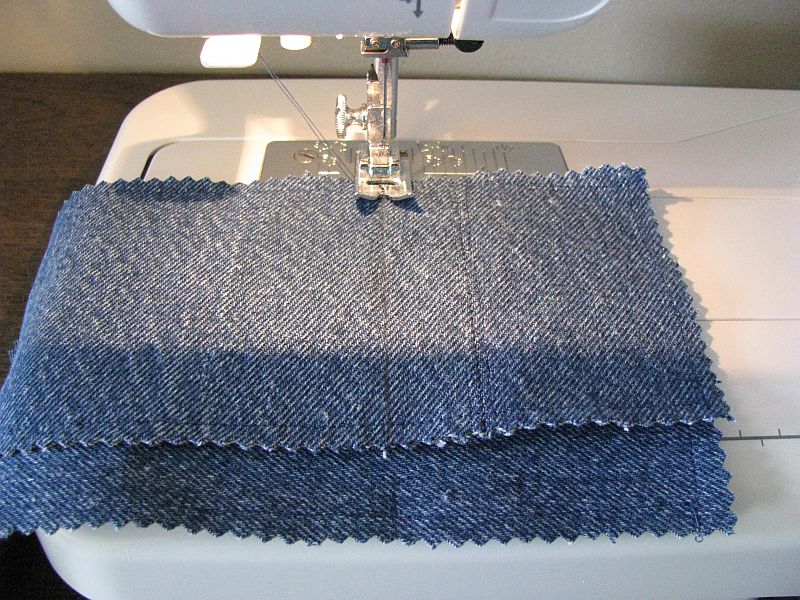
Fold the Wallet Base back so that you have just the Large Inside Pocket on one side, and the three layers on the other. Lay your 2 ½” x 3 ¾” pocket on one end, matching the raw edges as shown here. Sew on the three outside edges of this pocket.

Place the Pocket Flap on top of and “above” the pocket. The edge of the flap should be atleast ½” away from the edge of the pocket. Stitch across the top of the flap to hold it in place.
The pictures below show it after it’s been sewn. You only want to be sewing this pocket through two layers .. the top piece you are attaching and the Large Inside Pocket. The Wallet Base should be folded back out of the way while you are doing the actual sewing.


Next, we will turn this over to be face down, and add our Outside Pockets. You will want to decide which side you want the small & large pockets to be. I put my larger pocket over the top of the pocket & flap end. Lay it out and test folding it to be sure you have it the way you want it.
Then, sew around all 4 outside edges to secure all pockets in place.


Your wallet is complete. Fill it with money and plastic!


Subscribe to:
Posts (Atom)