
Tuesday, February 22, 2011
Port Washington, WI
We were in Port Washington, Wisconsin this past weekend .. I took this picture there ... I think it turned out quite well! :)

Monday, February 14, 2011
Tara's Favorite Bag - Zipper Part 2 :)
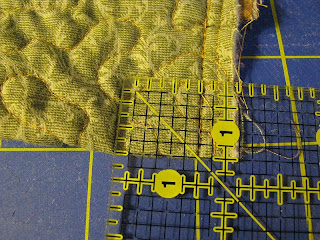
Okay, so, we have the zipper attached to the zipper fabric, and there's excess zipper at both ends :)
Now, while the zipper is still easily manueverable, you will want to trim the "open" end of the zipper to about 1 inch from the end of the fabric. Fold back this zipper at a slight angle, and stitch/tack it in place securely. This picture should help explain what I mean.

The picture shows the zipper attached, but that's only because I didn't take a picture before attaching it.
The next step is to pin your zipper piece to the bag. Look at this picture while I explain.

 The above picture shows a close up of the "bottom" end of the zipper. This end will be a little tight to stitch around, but if you take your time it should be fine. We are not stitch quite yet however. We need to pin the binding to the top as well.
 So we are going to take our binding strips (2 1/4" x 40") and pin it on top of the zipper fabric. Still working with the bag inside out. I leave a few inches of the binding fabric beginning and end unpinned so that I can cut them to fit perfectly in a bit. First we will stitch the binding and zipper fabric to the top of the bag. Looking at the picture above, we will start to the right of the open binding ends, stitch around the top of the bag and end to the left of the loose binding ends. There will be about 4 inches that isn't stitched yet.
 Above is a picture of the zipper and binding at my machine. I'm ready to stitch. (Remove the pins before you get to them.)
 I take the piece out of the machine. Then I lay the bag flat, and smooth out the loose binding ends. I want to cut them so that they overlap 1/2 of an inch. I usually estimate, but you can measure exactly if you'd like to.
 I then pin the ends together, and pulling / folding them out from the bag, I take it to the machine and stitch the binding closed. See picture below for what it will look like when flattened out again.
 Then take it back to the machine and complete the binding stitching. The binding and zipper fabric should now be securely fastened to the bag. Our bag is still inside out!
 Next we want to fold the binding all the way to the inside of the bag (which in this current position is the "outside" of the bag) .. You can see in the above picture that I smooth it out so that the seam will be pressed over as well as the binding. The line between the tan binding in this picture and the green zipper fabric is actually the seam line as well. Fold over and pin all the way around the bag.
 When you get to the "bottom" end of the zipper, pin the ends of the zipper on top of the binding. This will secure this end and make opening and closing the zipper easier.
 We will then do our top finish-stitching. First, stitch a generous 1/4 inch from the seam line. This will place the stitching just on the edge of the bulk of the seam which was turned over. (This first stitching is shown in the picture above.)
In the picture below, you see the 2nd line of stitching, which is right on the edge of the fold of the binding. This should be 1/4 " away from your first line of stitching.

Turn your bag right side out. Are you ready? There is your finished bag! :) Isn't it magnificant! :)

Now, while the zipper is still easily manueverable, you will want to trim the "open" end of the zipper to about 1 inch from the end of the fabric. Fold back this zipper at a slight angle, and stitch/tack it in place securely. This picture should help explain what I mean.

The picture shows the zipper attached, but that's only because I didn't take a picture before attaching it.
The next step is to pin your zipper piece to the bag. Look at this picture while I explain.

You want to center this zipper fabric in the center of your bag. You will have your bag inside out, and the zipper fabric will be on the "right" side of the bag as you see here. The "inside" of the bag is the greenish/tan.. an the "outside" is the purple. You will have about 1 1/2 inches from the end of the zipper fabric to the seam on both ends. Pin this well.


In the picture below, you see the 2nd line of stitching, which is right on the edge of the fold of the binding. This should be 1/4 " away from your first line of stitching.

Turn your bag right side out. Are you ready? There is your finished bag! :) Isn't it magnificant! :)

Old Antique Quilts - For Sale !!!!
I've had two old quilts for many years .. over 10 years I think. I bought them at a garage sale.
I'm offering them for sale.


Details: Well, my 5 ft 5 inch son is holding them above his head ..so they are about a "full" size. Although I'm sure they aren't the standard measurements.
The whtie one has bleached feed sacks on the back... you can see the faint outline of a few of th eemblems that didn't quite bleach all the way out.
If you are interested, leave a comment or contact me by email. (tmskquilt at mchsi dot com)
As for price .. I'll accept anything reasonable .. so let me know what you think they are worth! :)
Thursday, February 10, 2011
Tara's Favorite Bag - the zipper - part 1
Okay, now don't be scared, but we are going to add a zipper :)
First off, we need to measure the bottom of our bag. (between the boxed corners.)

 Mine measures 15 1/2" and so I will cut my zipper fabric to 3 1/2" x 16". (two pieces)
I will then fold them right sides together, and stitch ONLY the short sides. I then trim the corner and turn it right side out. Press them neatly.


 And wahlah .. the finished zipper piece. You will notice that I left some length of zipper at the "bottom" end .. atleast an inch .. two inches would be fine as well, and the rest of the zipper is at the "top". I actually used a 22" zipper, instead of the 18" that I put in the requirements because that is what I had on hand... 18" would be the minimum size you'd want for this bag.

First off, we need to measure the bottom of our bag. (between the boxed corners.)


I will then fold them right sides together, and stitch ONLY the short sides. I then trim the corner and turn it right side out. Press them neatly.

I then pin the folded side of this fabric to my zipper. One piece of fabric on each side of the zipper, being sure that the ends of the fabric match up across the zipper.
The following pictures show me stitching the one piece of fabric one to the zipper. I always stitch to my zipper twice. The pictures show better then I can explain it with words.


I've got to run, but I'll try to post the next part soon!
Tara's Favorite Bag - the last inside pocket.
Hi all :)
Here is a still photo of measuring for the boxed corners. Just in case you can't see it well in the video. Notice again that you should measure the same measurement from the fold and from the stitching.
 .
.
Option 1 is to ue your last pocket piece (about 4" x 6") and attach it as a wide pocket over the side seam.

Option 2 is to use your last pocket piece (about 4" x 6") and folding it, attach it as two smaller pockets over the side seam.

Here is a still photo of measuring for the boxed corners. Just in case you can't see it well in the video. Notice again that you should measure the same measurement from the fold and from the stitching.
 .
.After boxing the corners, the next step is to add the final inside pocket(s). You can add as many as you'd like, but I will be adding just one. The technique will be the same for all of them.
Option 1 is to ue your last pocket piece (about 4" x 6") and attach it as a wide pocket over the side seam.


Depending on what you plan to use for this pocket, it will determine which way to stitch the pocket on.
I have hand-sttiched my pocket on, because it goes down into the area behind the outside pockets. If I did it on the machine, I would be either stitching the outside pocket closed or fighting the outside pocket trying to get into a small space. If your pocket is above the outside pocket, then you will be free to use the machine, however, handing stitching works just as well.
One thing to be aware of, is to make sure that you are atleast 1 inch down from the top raw edge of the bag. We will be adding the zipper next and will need room for the seam allowance.
If you have additional quilted fabric, you can add an identical pocket on the other side seam. Add as many pockets as you like at this point.
Have fun! :)
Monday, February 7, 2011
Tara's Favorite Purse - Boxing The Corners
Sorry for the delay in getting this next step posted. Oh, the "best laid plans of mice and men" uh?
Today we will be working on boxing the corners of your bag. You should have already sewn down both sides of your bag, making a flat quilt look like a .. well, like a bag! :) I find this is the step when I get really excited about my bags because it is actually looking like a bag instead of just a layer of fabric. I can see the light at the end of the tunnel.
I have created a video for you to view for these directions, but I will say just a few things.
When marking your corners .. be sure you are measuring from the fold and from the stitching line. I used 3/4 of an inch for my measurement, if you want a wider bag, you can use 1" or a bit more. Just be sure that you stay atleast 1/2" from the binding of the outside pockets. You'll be able to feel the "bump" from these bindings. If you get too close to these, stitching the corner closed will be very difficult and you won't get a secure seamline.
After you have cut out the square for your boxed corners, you then pull the square open and flatten it. Then stitch it. I use a straightline stitch, and then go back and use a zig zag inside the seam allowance. You could use a serger instead of zig zag if you have one.
At this time you could also zig zag or serge your upper side seams. If you want to reduce bulk here, then you could alterantely using some fabric or seam binding and cover these raw edges with the seam open. It all depends on how "finished" you want the inside of your bag to be. I generally choose to zig zag these side seams.
Without further ado .. here's the video:
Subscribe to:
Posts (Atom)