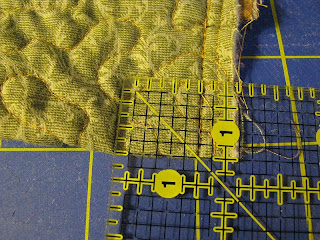
Here is a still photo of measuring for the boxed corners. Just in case you can't see it well in the video. Notice again that you should measure the same measurement from the fold and from the stitching.
After boxing the corners, the next step is to add the final inside pocket(s). You can add as many as you'd like, but I will be adding just one. The technique will be the same for all of them.
Option 1 is to ue your last pocket piece (about 4" x 6") and attach it as a wide pocket over the side seam.
Depending on what you plan to use for this pocket, it will determine which way to stitch the pocket on.
I have hand-sttiched my pocket on, because it goes down into the area behind the outside pockets. If I did it on the machine, I would be either stitching the outside pocket closed or fighting the outside pocket trying to get into a small space. If your pocket is above the outside pocket, then you will be free to use the machine, however, handing stitching works just as well.
One thing to be aware of, is to make sure that you are atleast 1 inch down from the top raw edge of the bag. We will be adding the zipper next and will need room for the seam allowance.
If you have additional quilted fabric, you can add an identical pocket on the other side seam. Add as many pockets as you like at this point.
Have fun! :)


1 comment:
yeah! i have time today where i will be sitting and waiting~i now know what i will be stitching on whilst i wait ;o) i have to work on "finishing" the seams first though. i am still pondering binding them as opposed to zigzagging them.
i am pretty excited about the upcoming zipper! and am really excited about being able to use this handy dandy bag soon.
Post a Comment